Thunderbird 5: Slow (and incompatible with ESET)

I recently upgraded to Thunderbird 5.  First impressions: pretty, and pretty slow. Lots of lag when deleting email made for a real pain when removing the 100 or spams and viruses that show up in my inbox every day.  There’s a fix.  It also doesn’t play nice with ESET security.  No fix available.

The lag when deleting each bogus email in the inbox was intolerable.  It’s likely the delay wasn’t so much in the deletion, but in displaying the next email in the list.  Like the FireFox font issues, this also relates to hardware acceleration.

Per this thread Why is Thunderbird 5.0 so SLOW? CAUSED by direct2d toggling gfx.direct2d.disabled and layers.acceleration.disabled to true (Go into Tools → Options → Advanced → General and click Config Editor)  speeds things up.  It did for me.

More troublesome was finding out that ESET is not compatible with Thunderbird 5 – or 4.  I’ve tried ESET a couple of times, but always gone back to Avast + Sphinx because ESET seems to make the S3 sleep issues worse on my desktop.  I decided to give it another try and went through the thrash of uninstalling the other stuff, fixing up my POP3 and SMTP settings, and installing ESET.  None of the ESET features showed up in T-bird.

ESET has said on various security forums that ESET 5 (the next version) will support T-bird 5.  Of course, by then we will be at T-bird 6.  Or 7.  Or 8.  Thunderbird 5Is ESET Smart Security compatible with Thunderbird?

I’ve decided to continue with the ESET experiment, so for now I’ve reverted Thunderbird to 3.1.11.

Posted in Default | Leave a comment

Cloning Hard Drives With Acronis

I previously wrote about using Acronis True Image Home or Lenovo Rescue & Recovery to back up a hard drive – and using that backup to migrate to another drive.  I’ve since used the clone tool in TIH 2011 to directly clone a laptop drive.

Those backup and/or clone notes are here: Acronis Backup vs. Lenovo Rescue & Recovery.  Of course, the authoritative writeup is over here: Hard Drive Clonewars – Klonkrieg der Festplatten

This post just adds a few notes to my previous post.  This effort came up when I had to quickly replace the new drive mentioned in “Acronis Backup…“.  The new Western Digital drive worked well, but made a maddening noise:  Strange Laptop Drive Noise: “Whoosh”  It was quickly replaced with a Hitachi 7k750-500 500G 7200RPM drive.

Update 2011.08.04:  Yike.  That 7k750 drive is an Advance Format unit with 4k-byte sectors.  Big fun: Windows Update Broken After Cloning Hard drive

This time I used the clone tool in Acronis True Image Home 2011 to clone the drive directly, rather than going through a backup and restore process.  It was very straight-forward, and apart from a couple of wrinkles, automatic.  First,  when cloning (using any tool) the target drive must be installed in the ThinkPad, or the operation is likely to fail.  This seems to be a quirk of ThinkPads, and requires removing the drive from the laptop and putting it in some kind of external SATA-to-USB adapter, and putting the new drive in the laptop before cloning.  Before removing the original drive from the laptop, I’d suggest running a drive cleanup, and possibly capturing the volume ID.  More on that below.

Once the drives were in the appropriate configuration (old one in an external enclosure, new one in the laptop) I booted Acronis TIH from my “swiss army” flash drive.  The CD version works too, but I prefer the convenience and speed of a flash drive.  Some notes about bootable flash over here:  Bootable USB Flash Drive Tools and hopefully a more detailed writeup later.

Selected the “Tools” menu, and “Clone”.  Since I wasn’t changing drive configuration, it pretty much went automatically from there.  Both drives were 500G, with about 160G of actual data.  The full operation took just under 1 hour and 20 minutes.  Not bad.  Shut down, rebooted on the new drive, and Bob’s your uncle.

Now, about that volume ID.  Some of my software is tied to the volume ID of the drive on which it is installed.  The TIH clone tool makes no provision (that I could find) for preserving the ID during a clone operation, so the new drive ends up with a different ID.  Most software doesn’t care, but mine does.  It’s fairly easy to relicense, but easier yet to clone the ID.  This can be done manually by capturing the ID before removing the old drive.  Use the “vol” command in a command prompt window.  After the new drive is up and running, the volumeid command can be used to restore the ID on the clone.  Volumeid is available here: VolumeID v2.0

The only other detail I had to deal with was getting Rescue & Recovery to boot instead of Windows when the “Think” button is pressed.  The bootloader must need to know the location of the bootable R&R image on the drive.  After cloning, that location has changed and the “Think” button just gets you to “windows failed to load” or something.  It’s easy enough to fix.  Just reinstall R&R – or easier yet, just fix it by launching the original installer and selecting “repair”.  On my machine, it’s located here: C:SWTOOLSReadyAppsrndtvtrnr.exe.

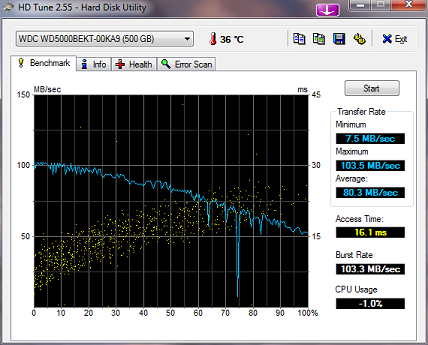
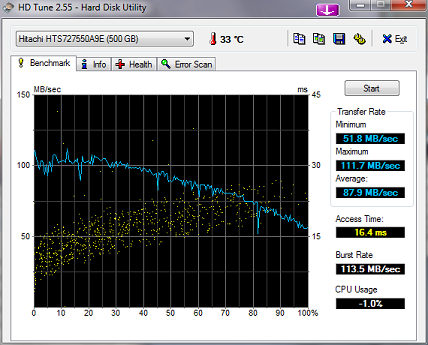
For the edification of all, here are the HDTune results for the WD and Hitachi drives:

Posted in Default | 2 Comments

Strange Laptop Drive Noise: “Whoosh”

I recently upgraded the 320G 7200RPM drive in my ThinkPad T400 to a 500G 7200RPM drive.  The new drive works, but intermittently makes a really annoying “whoosh, whoosh…” noise.

I had a perfectly fine Hitachi 320G drive in the StinkPad, but it was rapidly filling up with virtual machines.  I intended to upgrade to a 500G Hitachi, but they were out of stock at NewEgg.  I ended up ordering a Western Digital Scorpio Black WD5000BEKT from Amazon.

I cloned the old drive to the new with Acronis True Image Home 2011: Cloning Hard Drives With Acronis.  The new drive performs a little better than the old Hitachi, so that was a plus.  It runs fairly cool, and is mostly pretty quiet.  Mostly.  From time to time it starts making a “whooshing” sound that is plainly audible in a quiet room.  It isn’t quite constant, and is random enough to be very irritating.

It isn’t the normal rotational noise, or the head actuator “click”.  Both of those are present, but not particularly loud.  The “whoosh” may be associated with head actuation, or perhaps disk activity in general.  It sounds somewhat like the disk RPM rising and falling, but I don’t know if that is actually what is happening.

Apparently this has been an issue going back several years: Does your WD 320GB or 500GB hard drive make ‘swoosh’ sounds?

I contacted WD support, and they said the drive should be replaced.  Amazon replaced it promptly with another drive that did exactly the same thing.  Amazon let me return that drive and I’ve now installed the Hitachi that I wanted in the first place.  It’s a 7k750-500.  Fast, cool, and quiet.  Nice.

Update 2011.08.04:  Yike.  That 7k750 drive is an Advance Format unit with 4k-byte sectors.  Big fun: Windows Update Broken After Cloning Hard drive

Posted in Default | 3 Comments

Acronis Backup vs. Lenovo Rescue & Recovery

In the past, I used Lenovo Rescue and Recovery to back up my ThinkPad, and for disk migration.  This time I used Acronis True Image Home.

Rescue and Recovery – the backup and restore solution provided with ThinkPad laptops – has been my tool of choice.  I use it to take occasional full-disk backup images.  I’ve also used an R&R image to migrate to a larger hard drive.  It’s a simple matter of making a backup (not a bad idea anyway), installing the new larger hard drive in the laptop, and restoring from the saved backup image.

That has always worked OK for me, but as the drives and images got larger, the backup process got progressively longer and slower.  I use Acronis True Image Home on my desktop for weekly backups, so I gave that a try on the StinkPad.  The short version is: it worked.

The ThinkPad is a Lenovo T400 running Windows 7 Pro 64.  The “original” (not factory) hard drive was a Hitachi 320GB 7200RPM unit.  The Windows install is a Microsoft clean install (not from a Lenovo factory image) updated to SP1 with all available/appropriate Lenovo drives and apps installed.  The MS install divides the disk into a 100MB System Reserved partition, with the remainder assigned to C:  The new part is a Western Digital Scorpio Black 500GB 7200RPM drive.  I chose the WD drive for several reasons:  5-year warranty, good reviews, and 512-byte sectors.  Many larger laptop drives have gone to “advanced format” using 4k sectors.  There can be alignment and performance issues with the AF drives and I was uncertain about restoring a 512-byte sector backup to a 4k sector drive.  The external HD used for storing the backup image is a Seagate 750GB 7200RPM 3.5″ drive in a USB 2.0/eSATA enclosure connected to the laptop via USB.

Update 2011.07.01 The new Western Digital drive didn’t stay long.  It got replaced by a Hitachi drive.  See Strange Laptop Drive Noise: “Whoosh”

Update 2011.08.04:  Oops.  That Hitachi  7k750 drive is an Advance Format unit with 4k-byte sectors.  Big fun: Windows Update Broken After Cloning Hard drive

I used Acronis TIH 2010 installed on the laptop to make a full disk backup image on the external drive.  I didn’t time the process (more on time below) but IIRC it took less than two hours, as did the restore.  When using the backup/restore process to a different sized drive, Acronis doesn’t offer the option of manually chosing the target partition sizes.  It scales each partition according to the overall drive sizes.  I believe the Acronis direct cloning option does allow choosing final partition sizes.

NOTE: when cloning (using any tool) the target drive must be installed in the ThinkPad, or the operation is likely to fail. Drive cloning wisdom available here: Hard Drive Clonewars – Klonkrieg der Festplatten

During the restore, I selected both partitions and the MBR for restore, and chose the “preserve disk signature” option, since some of my software is licensed to a specific disk ID.  After the restore Windows booted without complaint.  The only thing (so far) that needed fixing was the option to boot direct to Rescue and Recovery via the “Think” button or F11.  The magical code that can boot a WIM (or whatever it is) directly must need to know where that file is located on disk.  Reinstalling R&R corrected the problem.

The whole save and restore process seemed to be much quicker using Acronis than R&R so I ran a “quick” test to compare the two.  I only compared backup times and image sizes, not the restore time.

Same hardware and installed software as above, but now using the new WD 500GB drive as the source for the backup.  The C: partition shows about 165GB used out of 465GB in Windows Explorer.

Backup Tool Backup Time Image Size
Acronis TIH 2010 1.5 hours 93GB
Rescue & Recovery 4.31 8 hours 84GB

My guess is that the compression algorithms used by R&R are very expensive.  I’ll give up the 10% advantage in space used for the huge improvement in backup time.

Posted in Default | 1 Comment

Yum!

Add some Maguro Sashimi, and  you’ve got yourself a party!

Posted in Default, Food & Garden | Leave a comment