I previously wrote about using Acronis True Image Home or Lenovo Rescue & Recovery to back up a hard drive – and using that backup to migrate to another drive. I’ve since used the clone tool in TIH 2011 to directly clone a laptop drive.
Those backup and/or clone notes are here: Acronis Backup vs. Lenovo Rescue & Recovery. Of course, the authoritative writeup is over here: Hard Drive Clonewars – Klonkrieg der Festplatten
This post just adds a few notes to my previous post. This effort came up when I had to quickly replace the new drive mentioned in “Acronis Backup…“. The new Western Digital drive worked well, but made a maddening noise: Strange Laptop Drive Noise: “Whoosh” It was quickly replaced with a Hitachi 7k750-500 500G 7200RPM drive.
Update 2011.08.04: Yike. That 7k750 drive is an Advance Format unit with 4k-byte sectors. Big fun: Windows Update Broken After Cloning Hard drive
This time I used the clone tool in Acronis True Image Home 2011 to clone the drive directly, rather than going through a backup and restore process. It was very straight-forward, and apart from a couple of wrinkles, automatic. First, when cloning (using any tool) the target drive must be installed in the ThinkPad, or the operation is likely to fail. This seems to be a quirk of ThinkPads, and requires removing the drive from the laptop and putting it in some kind of external SATA-to-USB adapter, and putting the new drive in the laptop before cloning. Before removing the original drive from the laptop, I’d suggest running a drive cleanup, and possibly capturing the volume ID. More on that below.
Once the drives were in the appropriate configuration (old one in an external enclosure, new one in the laptop) I booted Acronis TIH from my “swiss army” flash drive. The CD version works too, but I prefer the convenience and speed of a flash drive. Some notes about bootable flash over here: Bootable USB Flash Drive Tools and hopefully a more detailed writeup later.
Selected the “Tools” menu, and “Clone”. Since I wasn’t changing drive configuration, it pretty much went automatically from there. Both drives were 500G, with about 160G of actual data. The full operation took just under 1 hour and 20 minutes. Not bad. Shut down, rebooted on the new drive, and Bob’s your uncle.
Now, about that volume ID. Some of my software is tied to the volume ID of the drive on which it is installed. The TIH clone tool makes no provision (that I could find) for preserving the ID during a clone operation, so the new drive ends up with a different ID. Most software doesn’t care, but mine does. It’s fairly easy to relicense, but easier yet to clone the ID. This can be done manually by capturing the ID before removing the old drive. Use the “vol” command in a command prompt window. After the new drive is up and running, the volumeid command can be used to restore the ID on the clone. Volumeid is available here: VolumeID v2.0
The only other detail I had to deal with was getting Rescue & Recovery to boot instead of Windows when the “Think” button is pressed. The bootloader must need to know the location of the bootable R&R image on the drive. After cloning, that location has changed and the “Think” button just gets you to “windows failed to load” or something. It’s easy enough to fix. Just reinstall R&R – or easier yet, just fix it by launching the original installer and selecting “repair”. On my machine, it’s located here: C:SWTOOLSReadyAppsrndtvtrnr.exe.
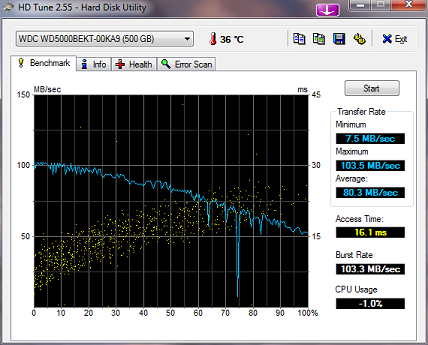
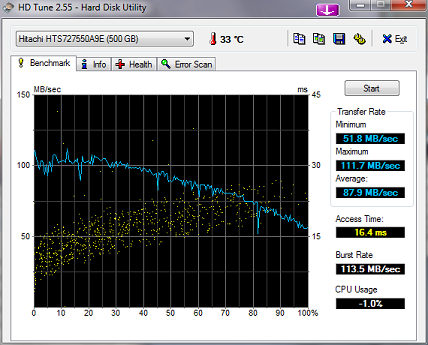
For the edification of all, here are the HDTune results for the WD and Hitachi drives:


Thanks for this article. Acronis worked fine for me upgrading from a 160 GB drive to a 500GB hybrid drive. Especially valuable is your hint about putting the new drive in the computer and cloning the old drive from a USB enclosure. When I tried it with the old drive in the computer and the new drive in the enclosure, I’d click Go and nothing would happen. Very odd.
Pingback: Windows Update Broken After Cloning Hard drive | GeezBlog